- Avicenna
- Posts
- Don't know anything about building with AI? Start here.
Don't know anything about building with AI? Start here.
Nofil Khan
July 05, 2025
Welcome back to the Avicenna AI newsletter.
Here’s the tea 🍵
How to start building with AI

Avicenna is my AI consultancy. I’ve been helping companies implement AI, doing things like reducing processes from 10+ mins to <10 seconds. I helped Claimo generate $40M+ by 10x’ing their team efficiency.
Enquire on the website or simply reply to this email.
In this newsletter I’m going to share how I would build something from scratch if I didn’t know anything about AI or software development.
This newsletter is for non-technical people who know nothing about AI or coding. If you want to understand how to build something, like a website or an app with AI, start here.
Technologies
Here are the technologies we’re going to use:
Cursor - this will write code
Replit - this will host our code (don’t worry if this doesn’t make sense yet!)
OpenRouter - this will make calls to AI models
What are we making?
ChatGPT.
Prerequisites
I am working on a Mac, but AFAIK, there shouldn’t be any difference between Mac and Windows for how things will work.
Part 1: Replit
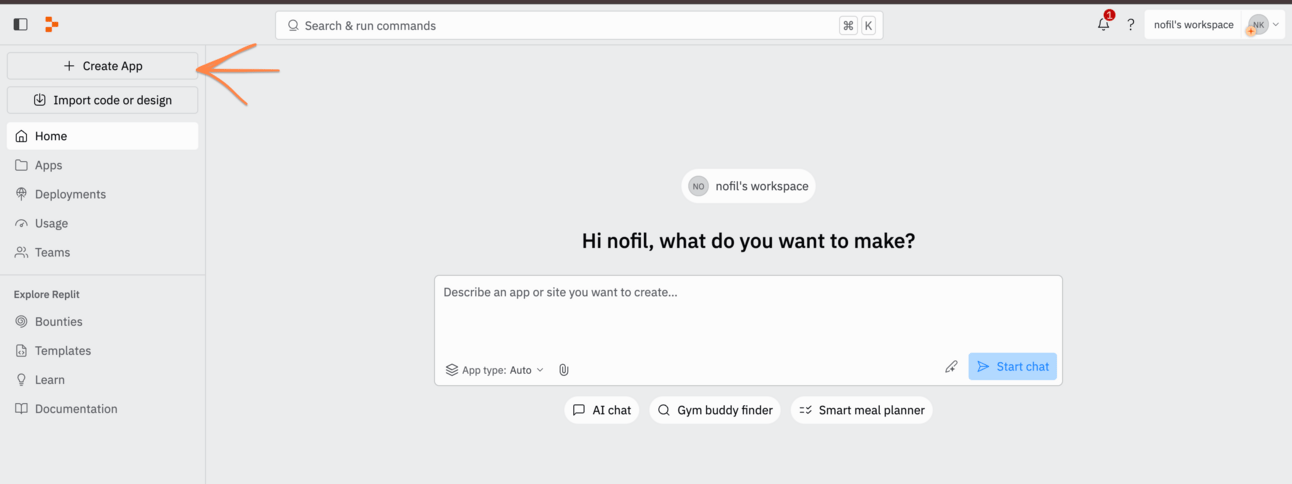
Once you’ve created your account on Replit, you will see this home page. From here create a REPL by hitting the ‘+ Create App’ button on the top left.
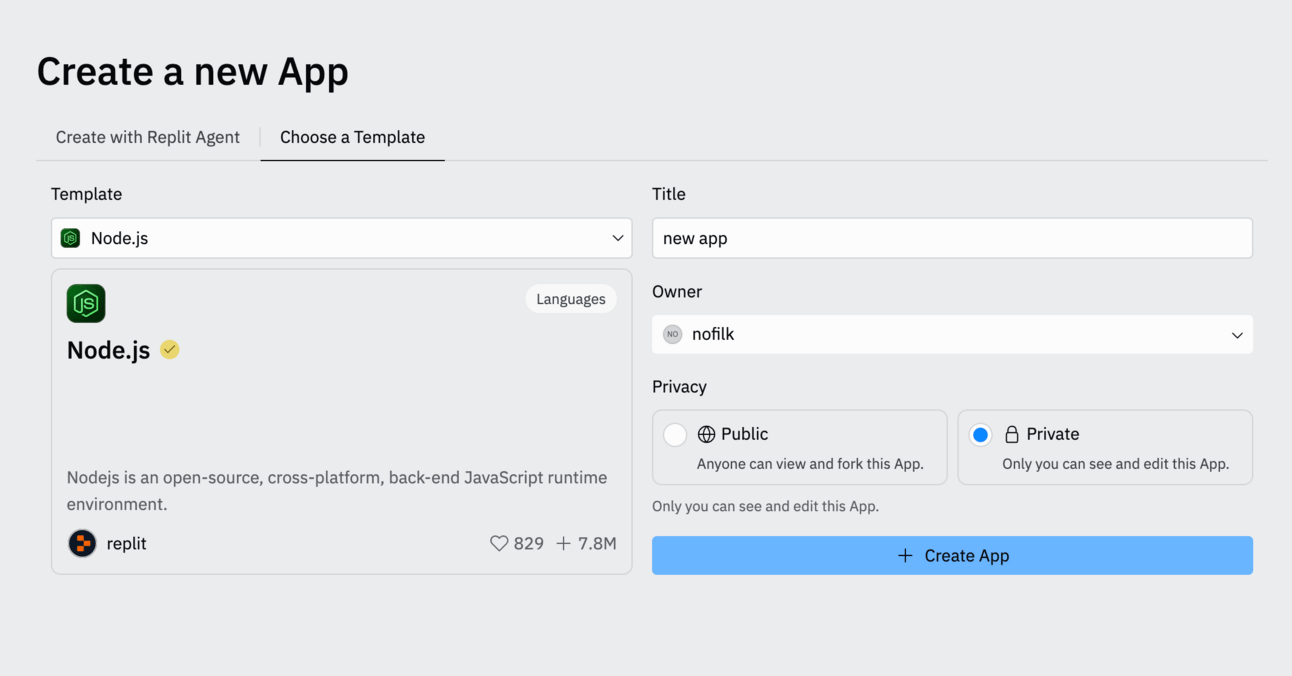
From here, select ‘Choose a template’. From the drop down, find the ‘Node.js’ template. Name it whatever you like and create the REPL.
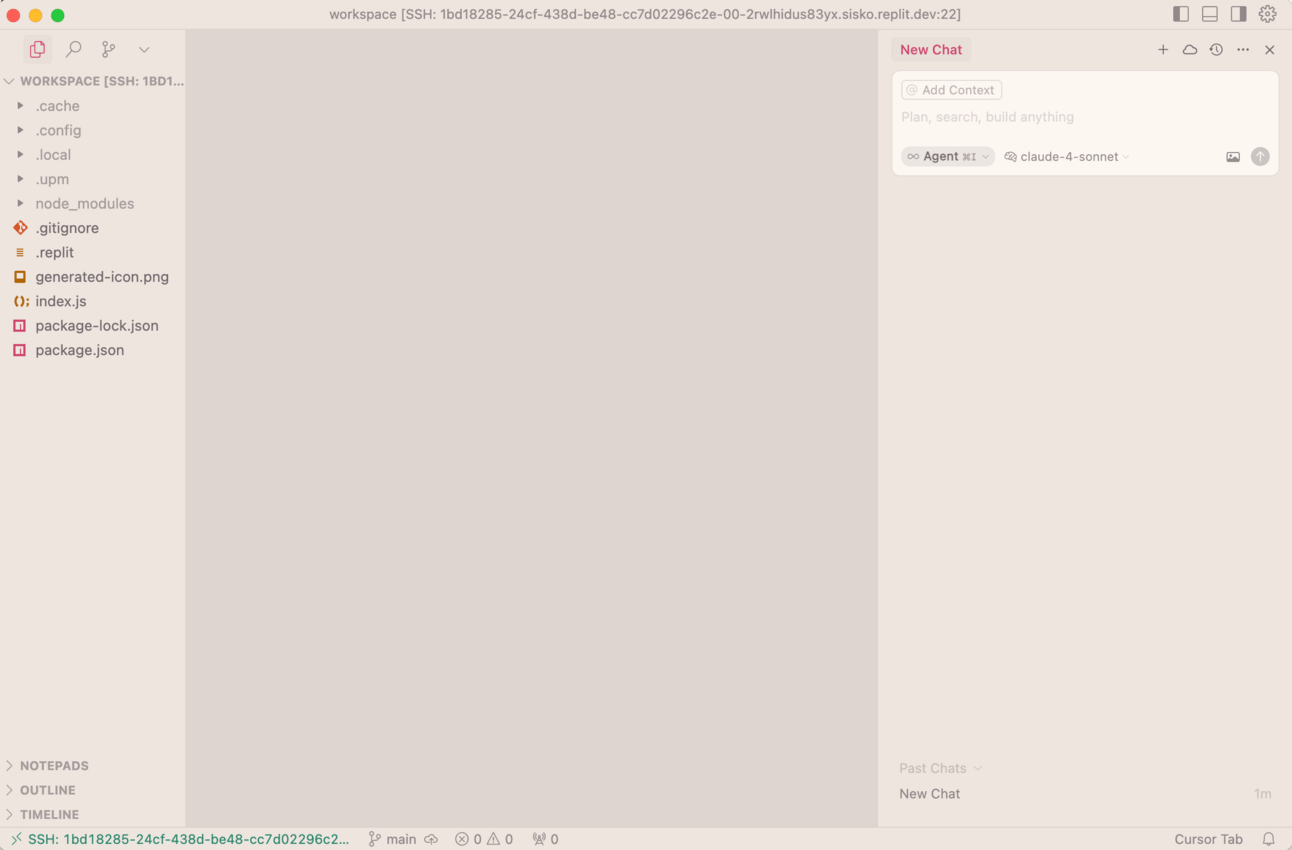
You’ll now be inside the REPL and it will look like this.
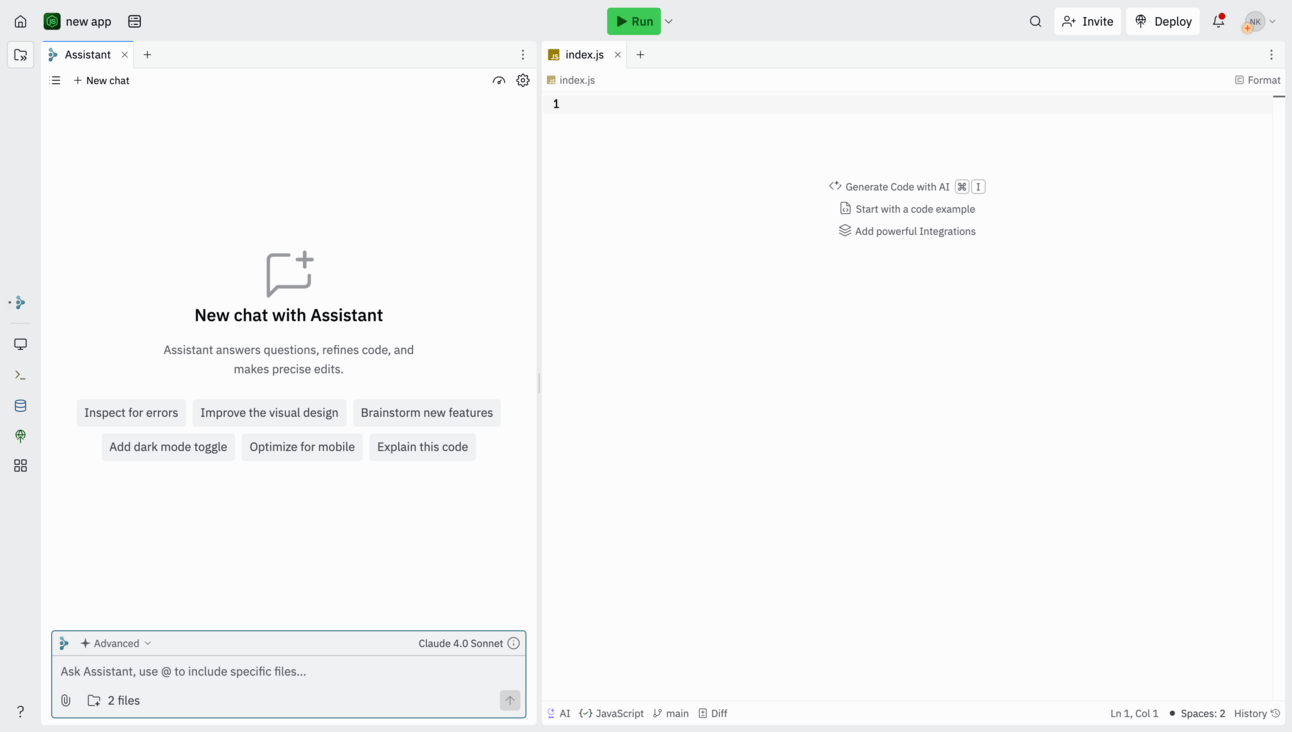
From here, open a new tab by clicking the ‘+’ icon next to the ‘Assistant’ or ‘index.js’; it doesn’t matter.
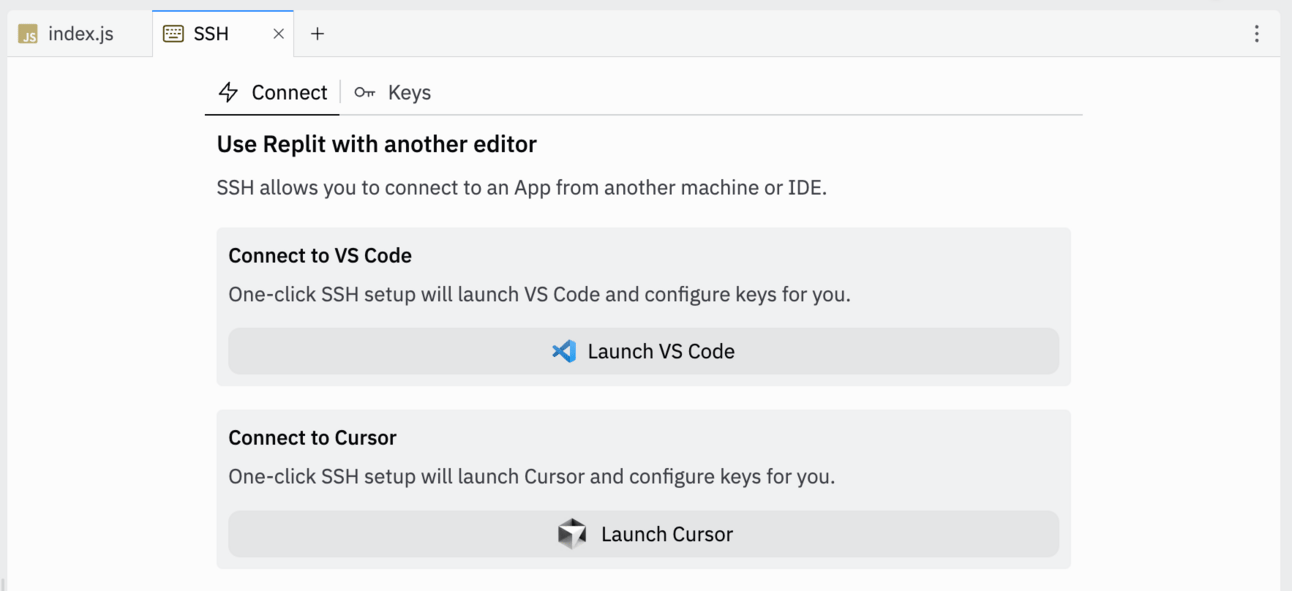
In the new tab search ‘SSH’.
From there click ‘Launch Cursor’.
Now Cursor will open and it will be connected to this app inside of Replit. This means when any new code is added by Cursor, the app will be automatically updated in Replit.
You’ll be asked to continue or cancel; just hit ‘Continue’.
Now we work in Cursor.
Part 2: Cursor
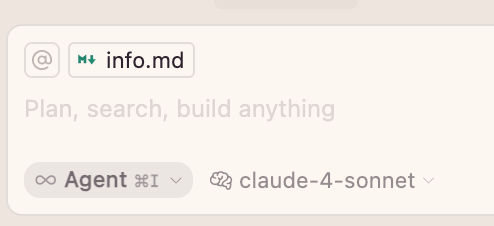
When you open Cursor, it’ll look something like this.
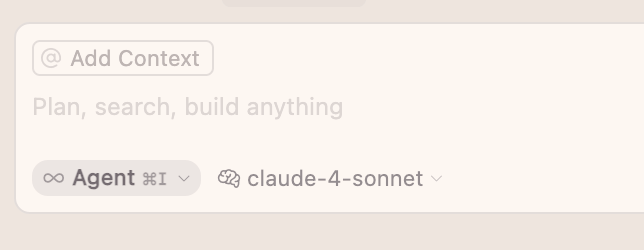
If you’re on the free version of Cursor, you won’t be able to choose different models. It will just say ‘Auto’ – this is in the top-right inside of the AI chat box. If you’re on a paid version, you can unselect ‘Auto’ and select a model. I recommend using ‘Claude-4-Sonnet’. It’s free if you’re a student.
The text that says ‘Agent’ is the mode of the model. There are 3 modes:
Agent
Ask
Manual
For now, we’ll stick with ‘Agent’ mode.
You can see all the files of the app on the left-hand side. You don’t need to pay attention to this. Hit ‘command + b’ to hide the file pane.
Now, it’s just the AI chat. In case the AI chat disappears, you can bring it back by hitting the button next to the settings icon on the top right, or clicking ‘command + i’.
We’ll leave Cursor here (don’t close it) and move to the next part.
Part 3: OpenRouter
Go to openrouter.ai. OpenRouter is a website that lets you call any and all AI models. It’s okay if you don’t understand how it works; it’ll make sense later.
Find the ‘Docs’ page on the OpenRouter website. It’s this one.
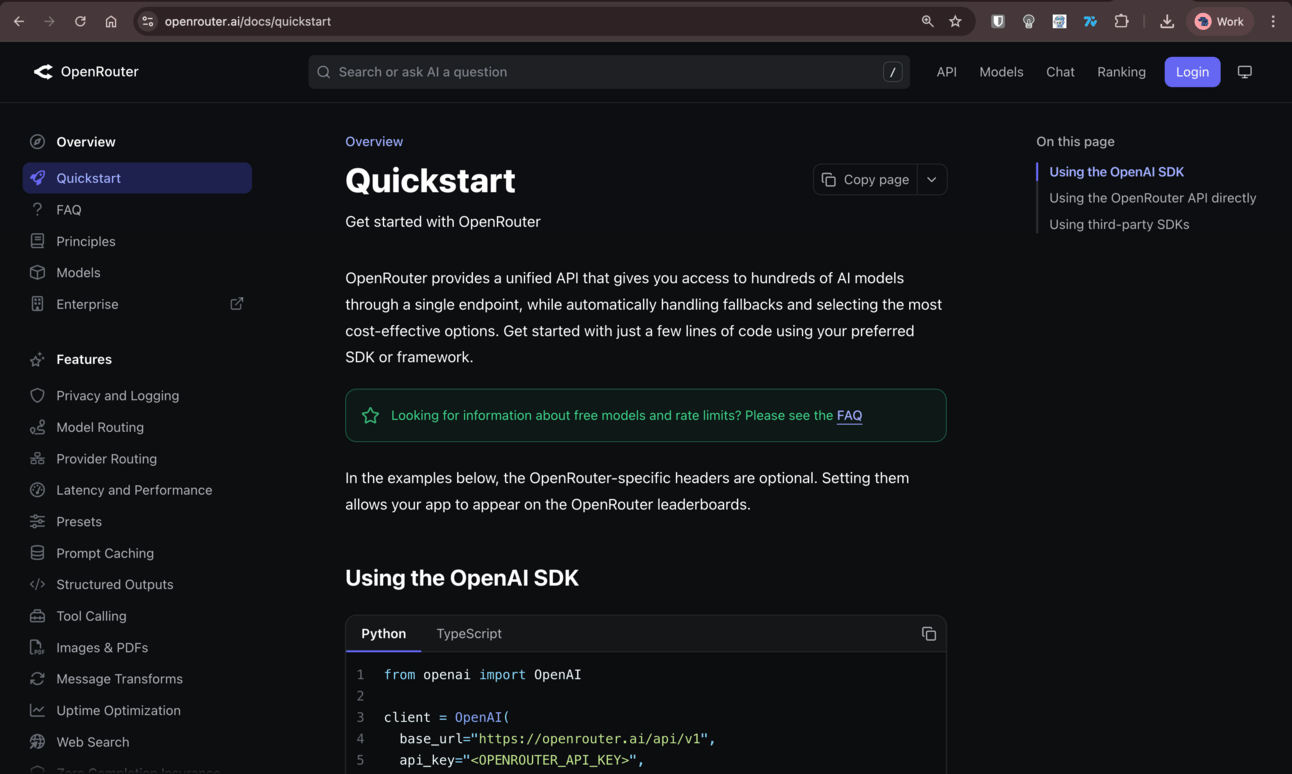
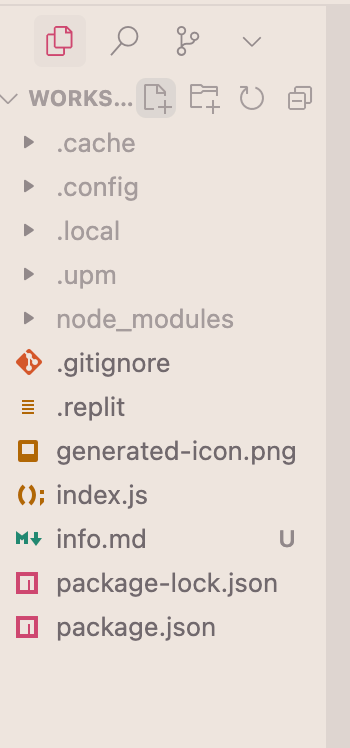
On the ‘Quickstart’ page, hit the ‘Copy page’ button. Now go back to Cursor and create a new file by clicking the button where it says ‘Workspace’. Call the file whatever you like (I called mine ‘info’). Save it as a .md (markdown) file, so the full file name will be ‘info.md’ or whatever you’ve named yours.
Now go into this new file and paste. All the info from the OpenRouter Docs page will now be in this file.
Part 4: Build
Now we have what we need to build a ChatGPT clone – a way to call AI models.
In the AI chat bar on the right, you’ll notice there’s an ‘@ Add Context’ button at the top.
Click on that, search for the new file you created, and select it. What you’ve done now is add your file to the context of this conversation, so the AI will be able to read and understand it whenever you ask it to do something.
Another way you can add a file to context is by typing ‘@filename’. You’ll notice if you type ‘@’ in the chat box, a dropdown of things will appear. From there you can find the file you want to add to context, or you can just type its name.
Now I’ll prompt the AI to build a ChatGPT clone with my info.md file as context.
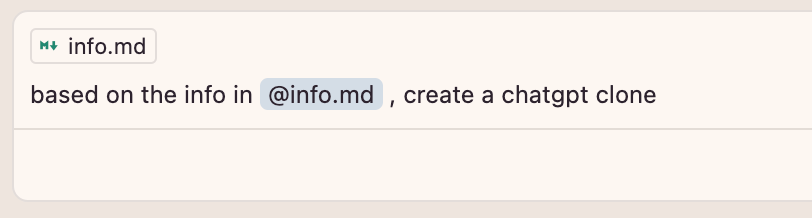
(You don’t have to add the file in context and also write it out in the message as well; this is just to show how we can give the AI a file.)
From here the AI will start building. It will list files and folders to understand the current structure and devise a plan. You can read its ‘thoughts’ if you click the ‘Thought for 7 seconds’ drop-down. It’s very interesting to see how it plans to complete the task.
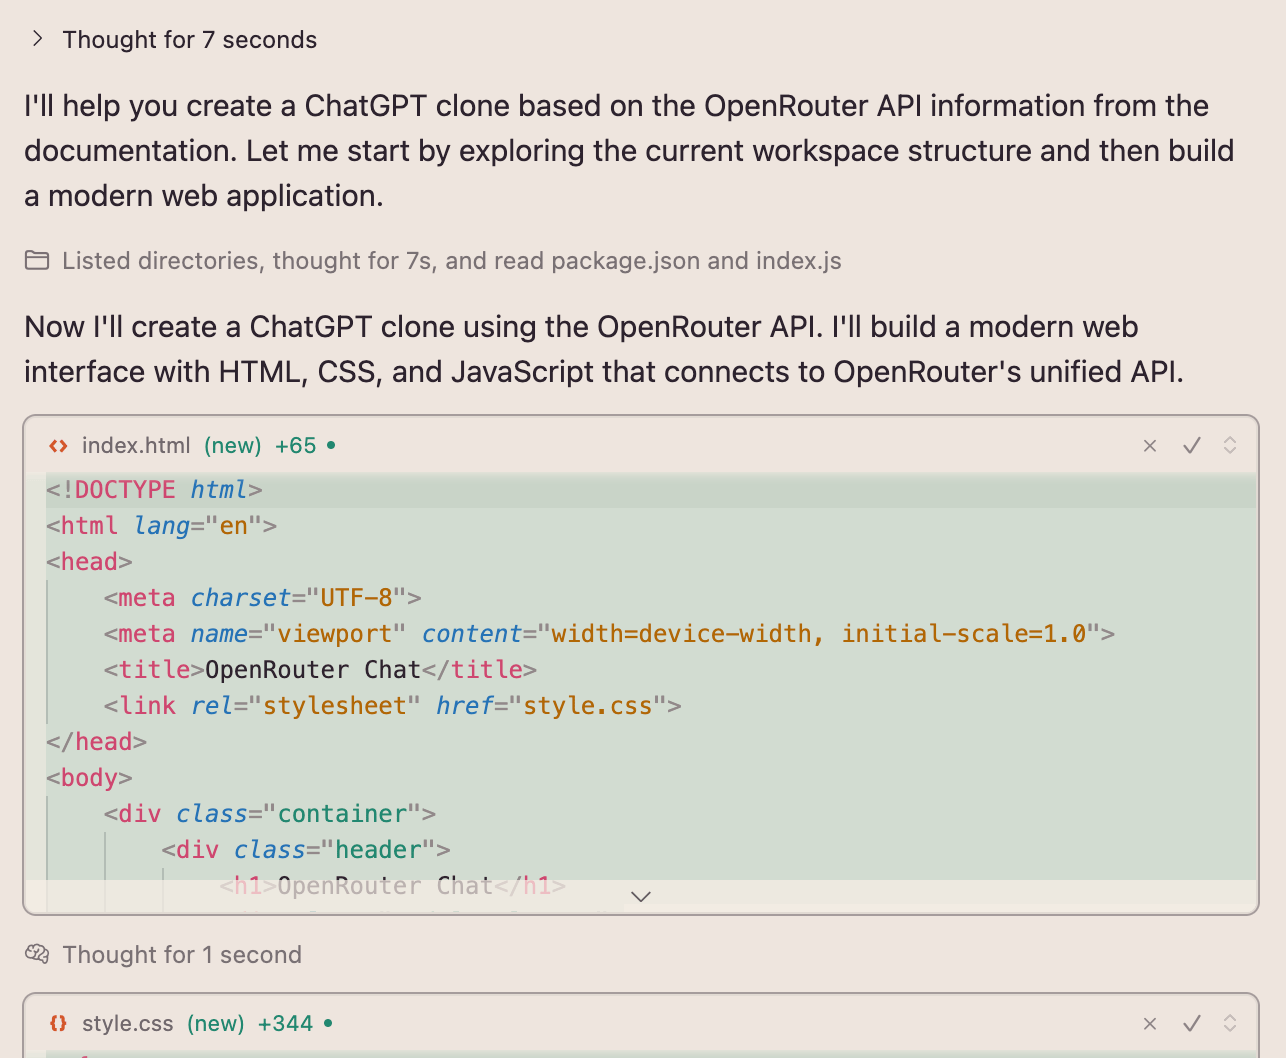
Make sure it’s in ‘Agent’ mode before you hit enter. Once it’s done, it might create a ‘README.md’ file which will detail what it built and what technologies it used.
After this, it might try and start the application itself. This requires the AI to use terminal commands.
What are terminal commands?
The terminal is how you can interact directly with the computer. In the terminal you can essentially do anything with your computer – create files, delete files, find files, create folders, etc. If you typed the correct command you could delete your computer system files and nuke your computer. This is why it’s a bit dangerous to let the AI run terminal commands without approval from yourself, the user.
In the ‘Chat’ tab under ‘Auto-Run’ mode within Settings, there’s an option to let the AI write code and run terminal commands as it sees fit. Now, it’s unlikely the AI will do anything crazy while running terminal commands, but it’s possible that it will randomly delete a file if it gets confused. At the moment, it’s probably best to NOT check this feature.
If you’re just starting out, it makes more sense to tell the AI to explain to you which terminal commands to run, how to run them, and why they are being run. This way you can have control over what’s happening, learn how to run terminal commands, and learn how to actually start an app. Don’t worry, it’s very simple. If you don’t understand something, ask the AI to explain it to you!
To open the terminal in cursor, just hit ‘command + j’ or hit the ‘Toggle Panel’ button next to Settings at top-right. From there, just follow what Cursor tells you to do to start your application.
Part 5: View your app
Once your app is done and you know how to start it, go ahead and do it. If there are any issues you see in the terminal, feed them back to Cursor to fix by copying and pasting into the chat.
I’ve published the result I got from a single prompt here [Link].
For this, I made no changes and no edits, going straight from prompt to deployment.
Part 6: You’ve built something. Now what?
Cursor has built your website/app, you’ve tested it, and it looks good! So, how do you share it with the world?
This is where the beauty of Replit comes in.
Since you were working with Cursor inside of a Replit app, all the code changes have already happened in the Replit app.
To push your app to the internet, simply click the ‘Deploy’ button on the top-right in Replit. Replit will recommend which deployment type to go with. These options are:
Reserved VM - always-on app
Autoscale - scales as users scale
Static pages - basic website with no backend
Scheduled - code you want to run at specific time intervals
For most things, Autoscale will work fine. Again, if you’re unsure about which to choose, ask Cursor 😉
If you do pick Autoscale, you can then choose how much compute to put behind the app. Don’t worry too much about this – you can leave it as is or set it higher if you want.
Once you do that, name your app, click ‘Deploy’, and your app will be pushed live on to the internet!
Part 7: Cursor tips
In the next newsletter or sometime soon, I will write more about Cursor and how to best use it. This newsletter is already too long.
Important things to note
Model names
When using OpenRouter, when you want to call certain AI models, you have to use the name specified by OpenRouter. You can find this on the models page on the OpenRouter website – https://openrouter.ai/models.
Cursor can get model names wrong, so you may have to provide this info to it.
Images and PDFs
What if you want the AI to read images or PDFs?
Simply go to the OpenRouter documentation page on image and PDF reading, which you can find here – https://openrouter.ai/docs/features/images-and-pdfs.
Copy the page and feed it to Cursor, the same way you did before. Then just tell Cursor to implement that functionality. You can do this for pretty much anything.
Security
We’ve created a very basic ChatGPT clone here. One thing you must remember is that there are heaps of security issues that need to be taken into account with software, and this isn’t something that is easily managed by AI.
Building a ChatGPT clone was meant purely for demonstration. Yes, it works, but that doesn’t mean you publish this on the web and sell it as a SaaS. Be mindful of security and data privacy.
Replit has an in built ‘Secrets’ tab where you can put sensitive info like API keys. Use it.
A quick caveat: This doesn’t mean you can’t build proper applications using AI; you can. It’s just that a ChatGPT clone is perhaps not the best starting point.
Building apps
One thing about AI coding, as far as my experience goes, is that AI is much better at backend coding than frontend. That is, it’s much better at working with databases and API endpoints than it is at designing a beautiful app.
It definitely can build a nice-looking app, but someone who is well versed in design and UI/UX will produce a much nicer-looking app.
There are a few ways around this. If you’ve got the design skills, you could design it yourself. If not, consider a program like ChatGPT or Midjourney to mock up app designs, or try Google’s new experimental UI designer Stitch. Or, you could just describe in detail what is needed and let Cursor do the rest.
What if I built an app in ChatGPT?
So you used ChatGPT or Gemini or Claude to build an app and you want to actually publish it. How do you do this?
The easiest way would be to simply copy and past the code into a Replit app. Before this Cursor and Replit workflow, I would code on the Claude or Gemini website and copy and past code. For now, copy paste will have to do.
Why Cursor?
Finally, you might be wondering why I suggest using cursor when Replit advertises itself as an AI app builder.
Yes, you could very well do this – Replit has everything you need, including an AI builder, an inbuilt database, authentication, and tons of other integrations.
However, the reason I use cursor is because (in my experience, at least) Replit’s AI just doesn’t work as well. I honestly wish it did so I didn’t have to pay for Cursor, but it doesn’t. Perhaps it’s gotten better lately, but for generally better performance, Cursor is the way to go IMO.
I do think that the future has space for both Replit and Cursor. Considering Replit went from 10M ARR to 100M ARR in the last six months, and Cursor just hired the lead engineer and project manager behind Claude Code, I think both companies will be just fine.
Conclusion and discussion
You might be thinking, ‘I don’t actually know what’s happening. How will I learn?’
This is a great question.
This guide is to help non-technical people to go from 0 → 1.
It’s becoming clear that AI is going to be doing a lot of code-writing. In fact, it already is. The real superpower of AI is empowering people who don’t know how to code to go from zero to one. Your goal is to build something. Anything. If you build something, you will be in the very small group of people that has actually used AI to build.
This is where the learning happens.
If you continue following the method that I’ve laid out above, you will naturally find efficiencies. What I have written in this newsletter is not necessarily the fastest way to build, but it is one of the best ways to get started.
It is clear what is happening and easy to follow; it’s not scary. Technically speaking, you can leave the AI in Agent mode and let it run terminal commands and write code while you sip your coffee.
The problem with this, though, is that there’s a decent chance that the AI gets stuck in a loop or makes a mistake. At the moment, it’s not quite good enough to course-correct without assistance. Someone who knows nothing about software development or doesn’t have extensive AI experience will not know how to help the AI when it gets stuck. You will end up with shitty code and an AI that will keep trying different things and take you for a spin.
It is very difficult to fix an AI’s mistakes. In fact, it’s so annoying that it’s often better to just let the AI start from scratch. Obviously this only applies to small projects, but the point is that if you can’t help the AI, the AI can’t help you. To learn how to help the AI, you need to build with it. You need to understand how it works.
For example, when Cursor finished building my app for me, it started the app on its own. It then checked that it was running, couldn’t find the process, tried again, found the process, and instead of leaving it, tested the app to see if it was there again(!) and couldn’t find it so went to shut it down. It can be very silly like this.
Read the ‘Thoughts’ below.
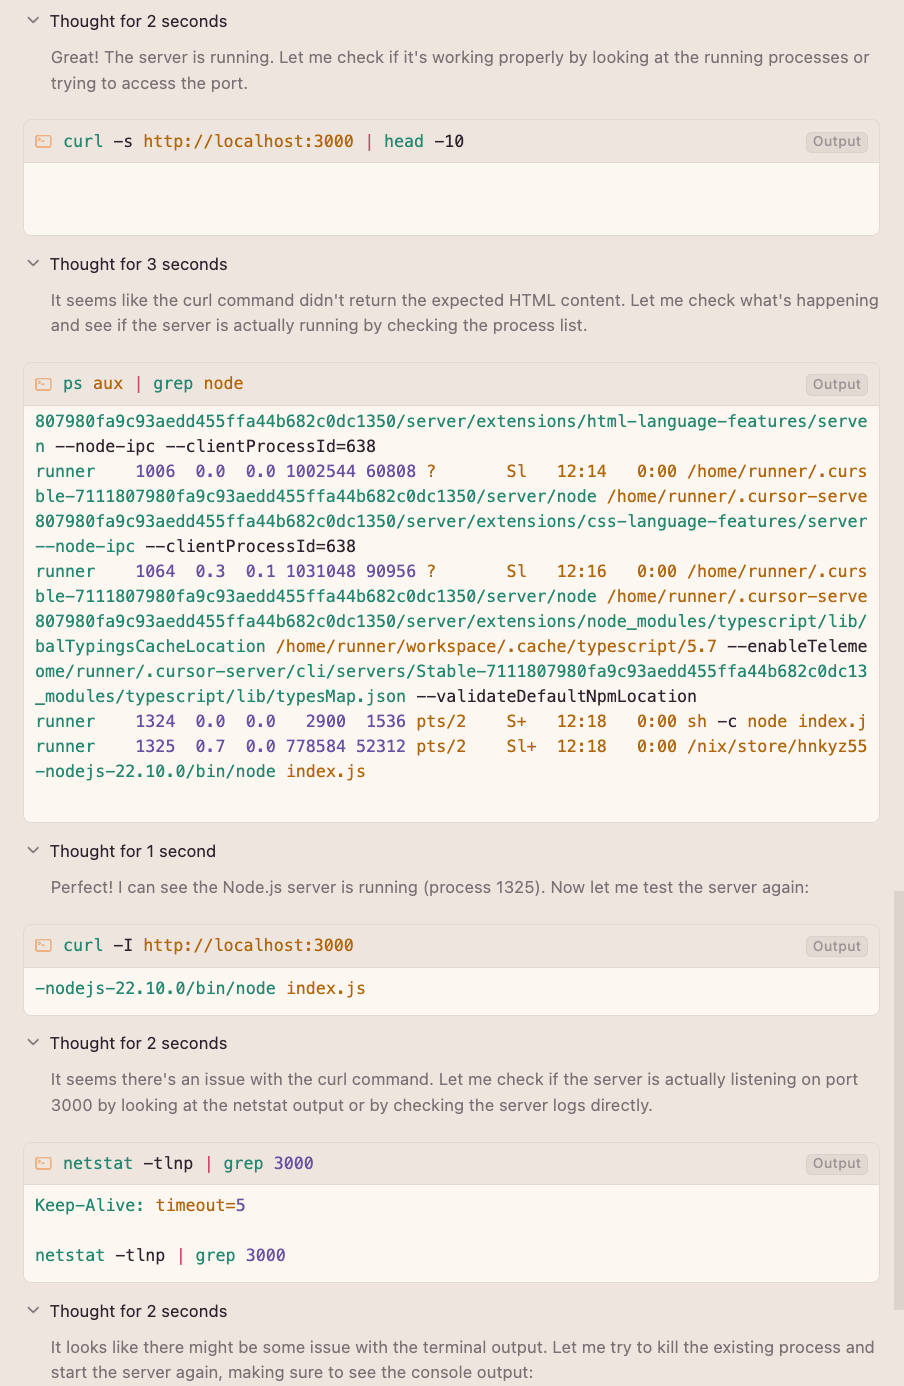
If you aren’t following what it’s doing, it can completely nuke your project.
By starting with the method I’ve mentioned and then continuing to actually build things, you will naturally learn how the AI operates. You will understand what its limitations are. You will understand what it can and cannot do. This is not something that can be taught; it is something that needs to be understood.
If you want to learn about AI and know how good it really is, build something with it. You will learn more about AI this way than watching dozens of videos or taking courses. I cannot emphasise enough how important it is that people try building with AI. It is an essential skill anyone can benefit from immensely. Having the ability to go from idea to working prototype in minutes is extremely powerful.
It will open your eyes to the possibilities. This is the goal: to expand one’s horizons and create a new understanding of the power of AI.
I recently attended a UNESCO AI conference in Bangkok, and one of the main issues pretty much everyone mentioned was education. There is a severe lack of AI education, both in the public and private sectors.
I am planning to build some sort of course or module for this. But you won’t need something like that if you simply build with AI.
Thanks for reading this guide on building with AI :) I’ll be writing more about this and other techniques, tools, and so on in the future.
Don’t worry, I’ll still write normal newsletters as well.
If you enjoyed this guide and would like to learn more about building with AI, please let me know by answering the poll below. What would you like to know? How to build an agent? An agentic system? Multi agent system? Using tools?
If you have any questions, you can comment on this newsletter in the browser.
Finally, if you would like to see more of these newsletters and support the work I do, it would mean a lot to me if you became a premium subscriber.
As always, thanks for reading ❤️
Written by a human named Nofil
Reply